"Changing Gmail settings can sometimes be a bit overwhelming due to the wide range of customization options available. However, a digital skill or walkthrough can provide valuable guidance to make the process easier and more accessible. That's exactly what this skill does. It assists users in navigating the Gmail settings menu, ensuring they can locate the specific settings they want to modify. Note: Please make sure you have logged into your web Gmail account. Display density settings: Comfortable."
-
1.
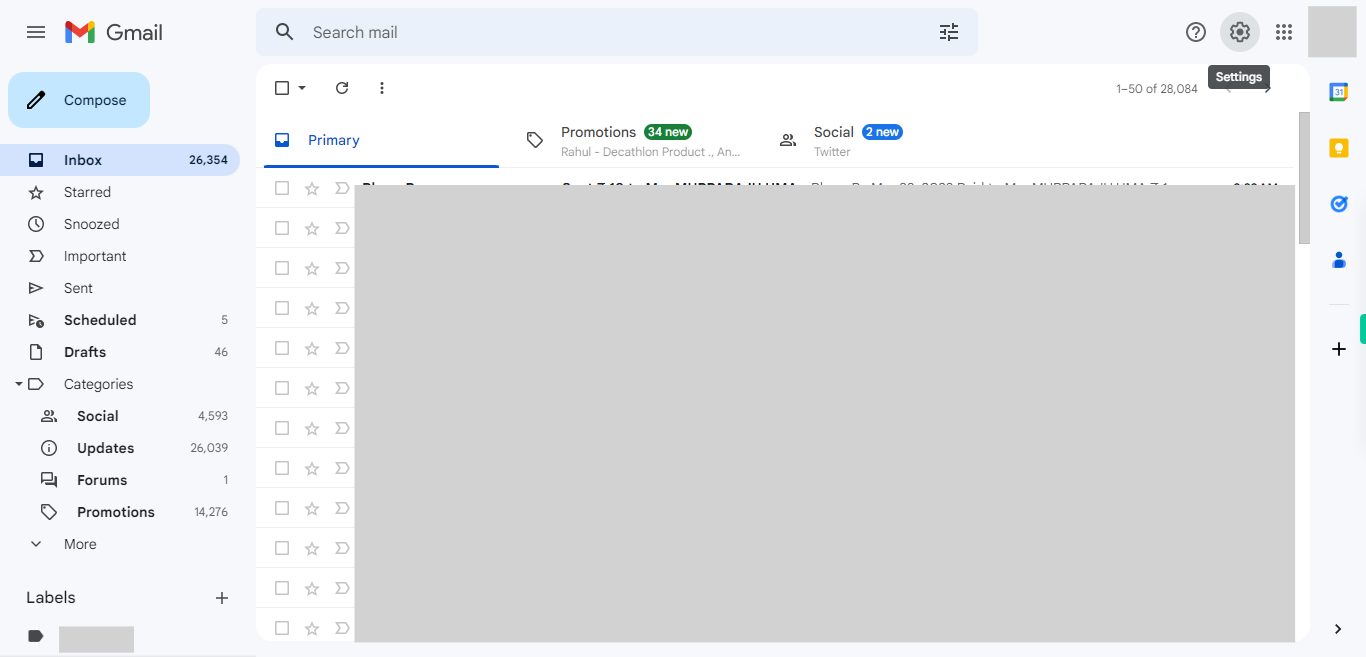
Open Gmail account.
-
2.
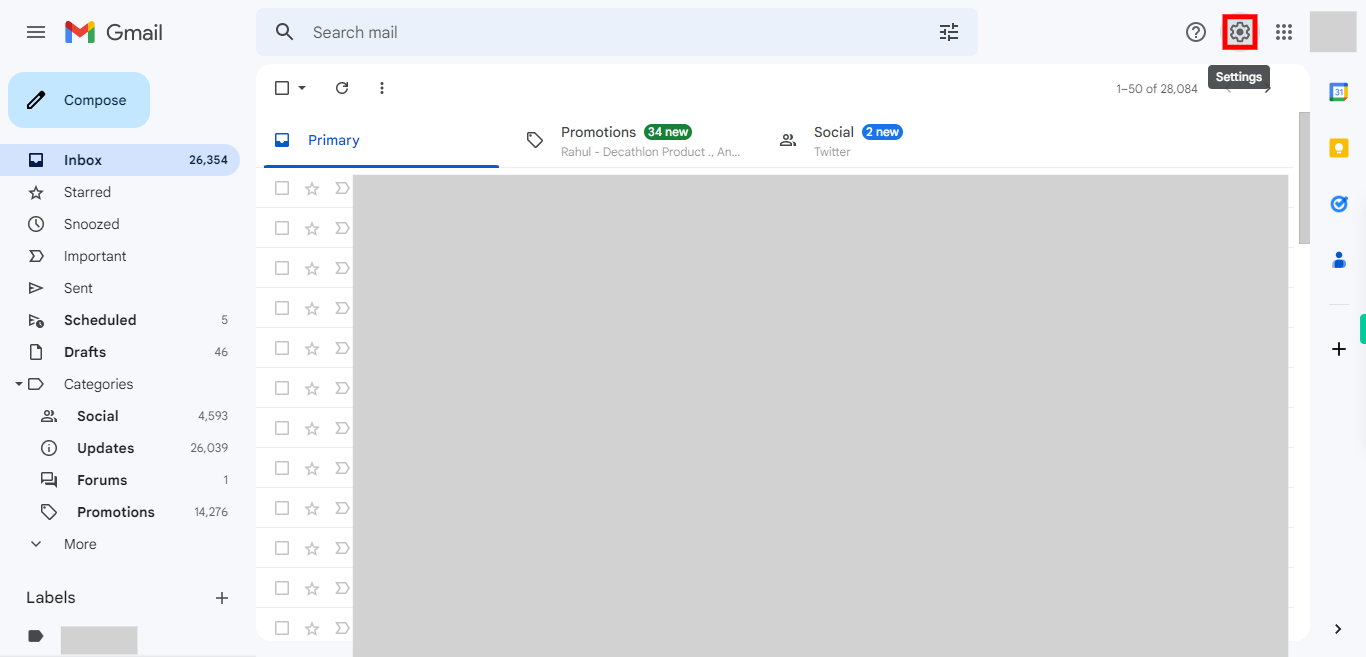
First click on the Next button on the Supervity instruction widget and then click on the Settings icon.
-
3.
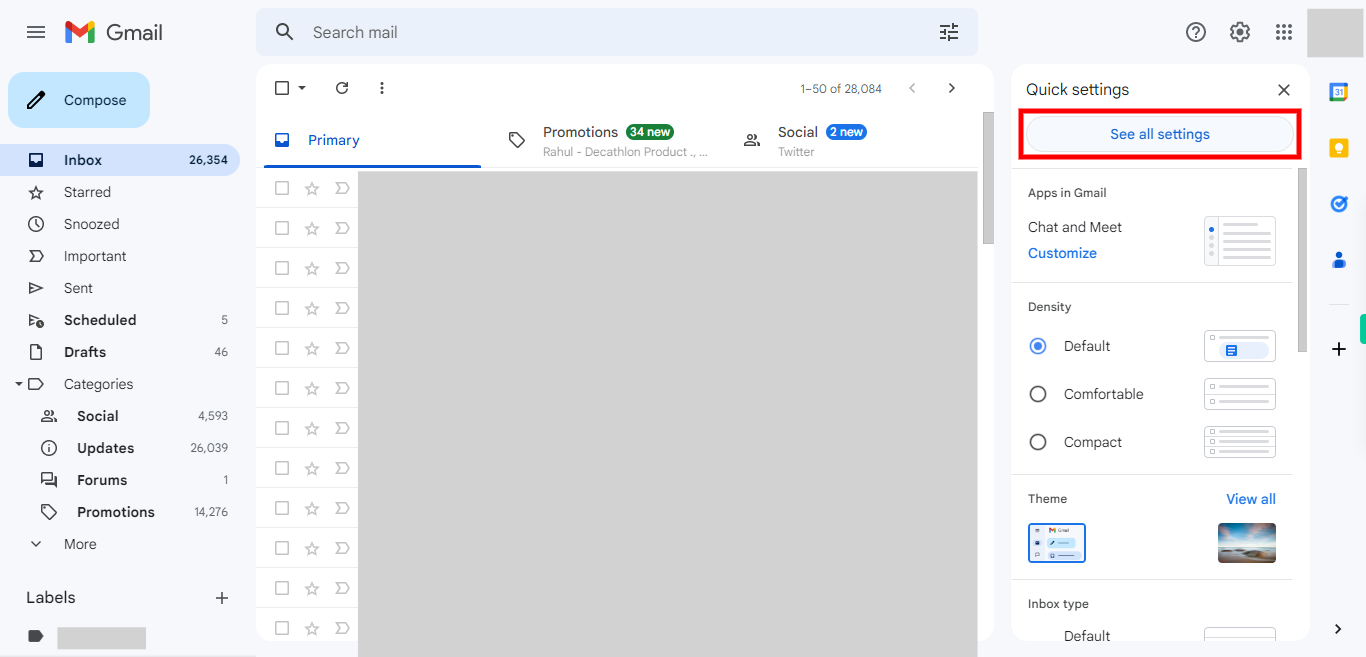
Click on the "See all settings" button. You will be navigated to the settings page.
-
4.
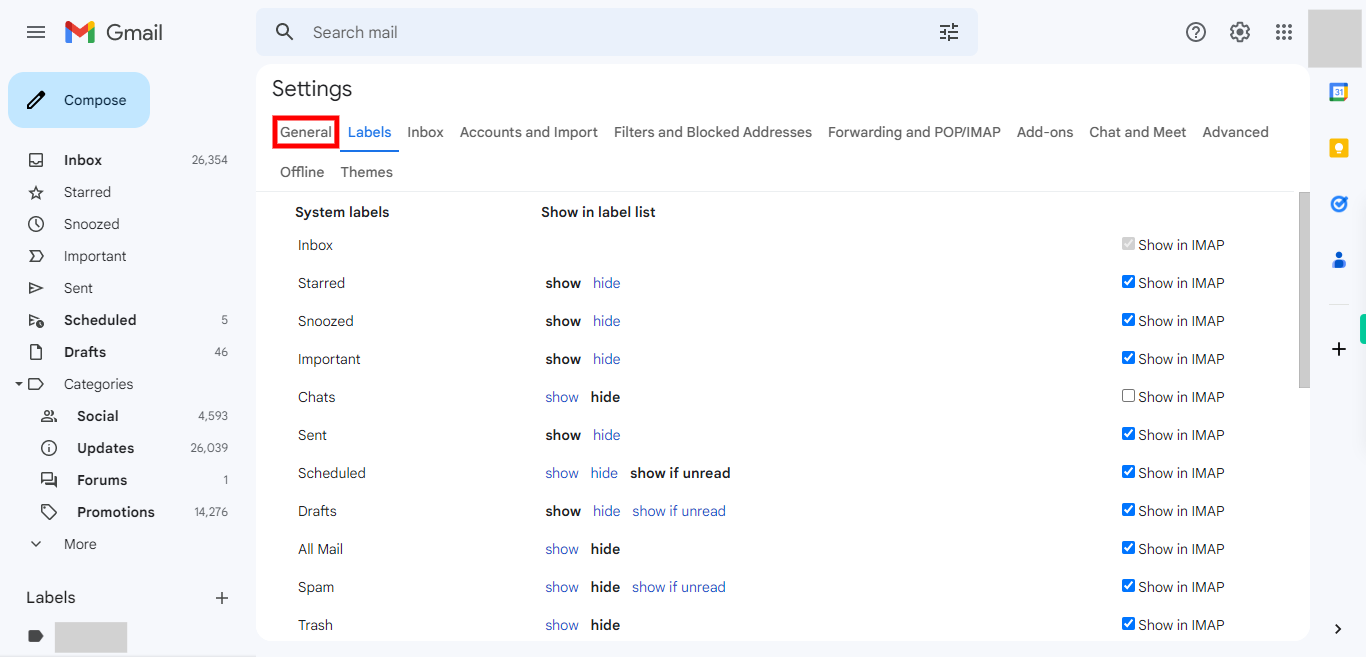
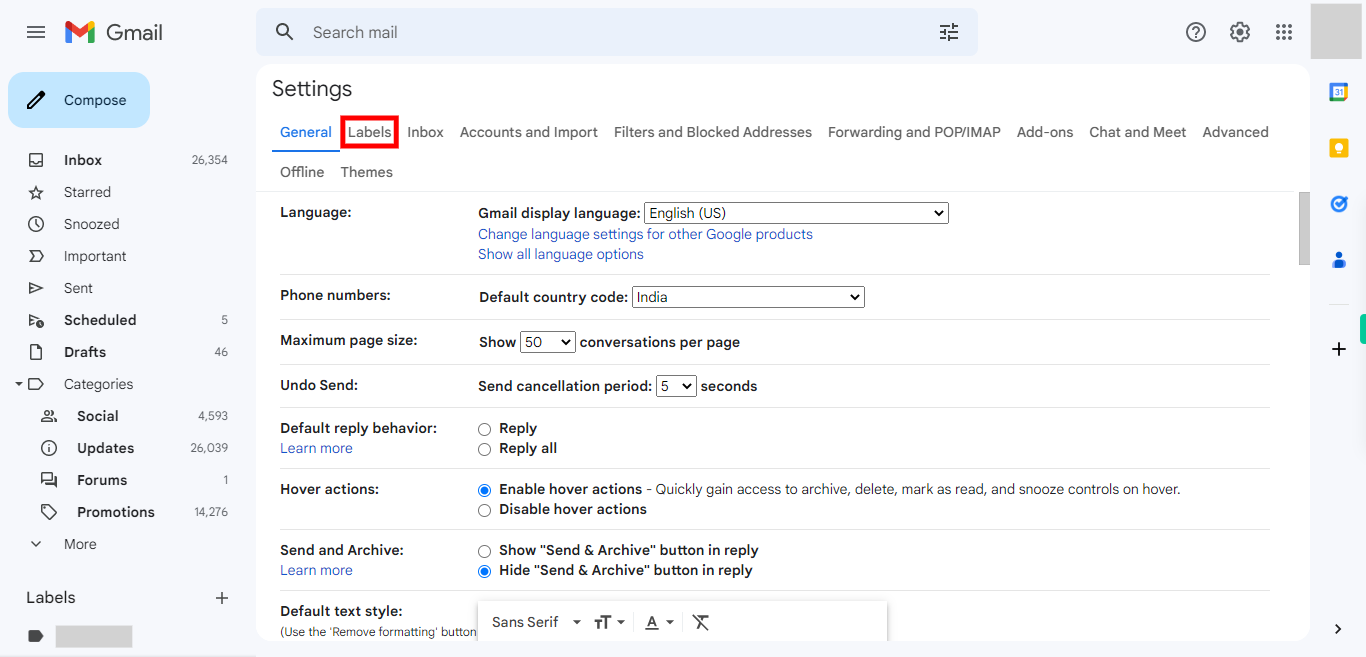
Click on the "General" tab and make any desired modifications. Here you will find a range of options to customize and configure your Gmail account. Some common options you may find are Language, Inbox type, Conversation view, Default reply behavior, Undo Send, Keyboard shortcuts, Desktop notifications, Stars, Personal level indicators, External content, Vacation responder, Signature, Offline, and Themes. Click on the "Save Changes" button located at the bottom of the page. Click on the Next button on the Supervity instruction widget. Note: Directly click on the Next button in the Supervity instruction widget if you don't wish to change anything.
-
5.
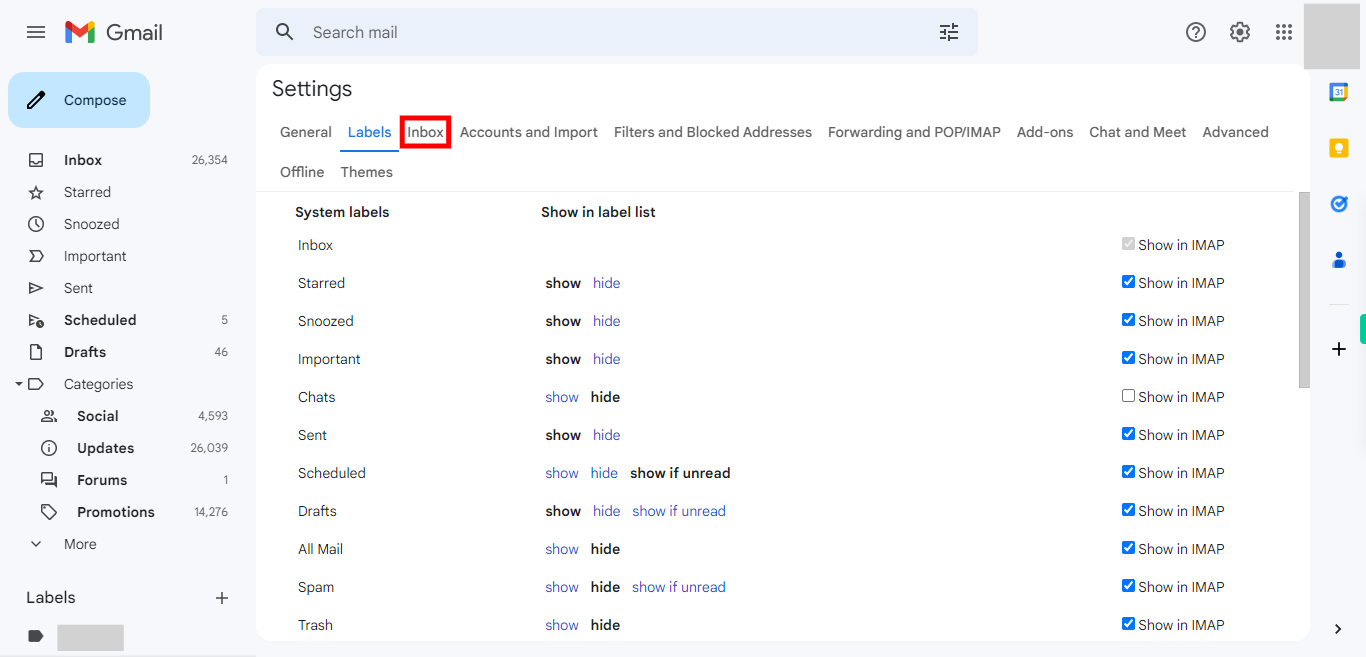
Click on the "Labels" tab and make changes if required. Here are some common options you may find in the Labels tab - Create new label, Show in label list, Label color, Show in message list, Nest label under, Remove label, Edit label name, Filter messages with a label, Sync messages, and Categories. Click on the "Save Changes" button located at the bottom of the page. Click on the Next button in the Supervity instruction widget. Note: Directly click on the Next button in the Supervity instruction widget if you don't wish to change anything.
-
6.
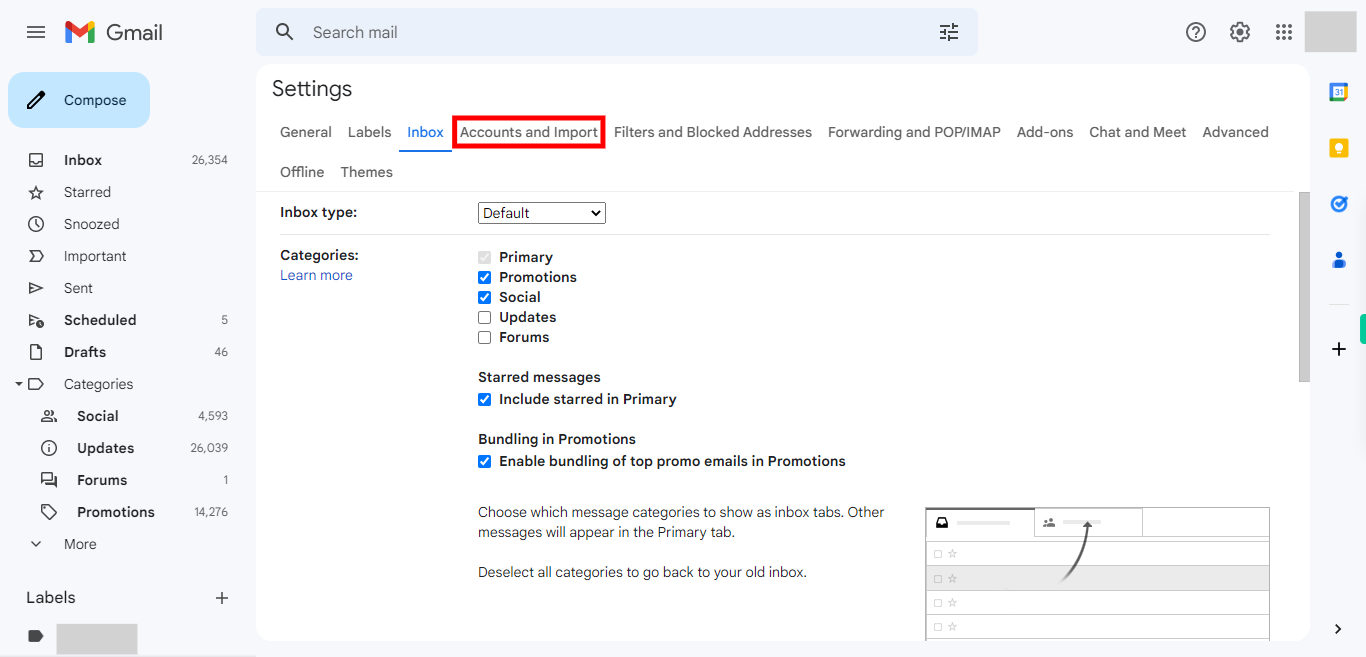
Click on the "Inbox" tab and make any modifications if required. Here are some common options you may find in the Inbox tab - Inbox type, Categories, Importance markers, Inbox sections, Reading pane, Density, Send and Archive, Undo Send, Conversation view, Snippets, Show indicators, Default reply behavior, Personal level indicators, responder, Signature, and Out of office auto-reply. Click on the "Save Changes" button located at the bottom of the page. Click on the Next button on the Supervity instruction widget. Note: Directly click on the Next button in the Supervity instruction widget if you don't wish to change anything.
-
7.
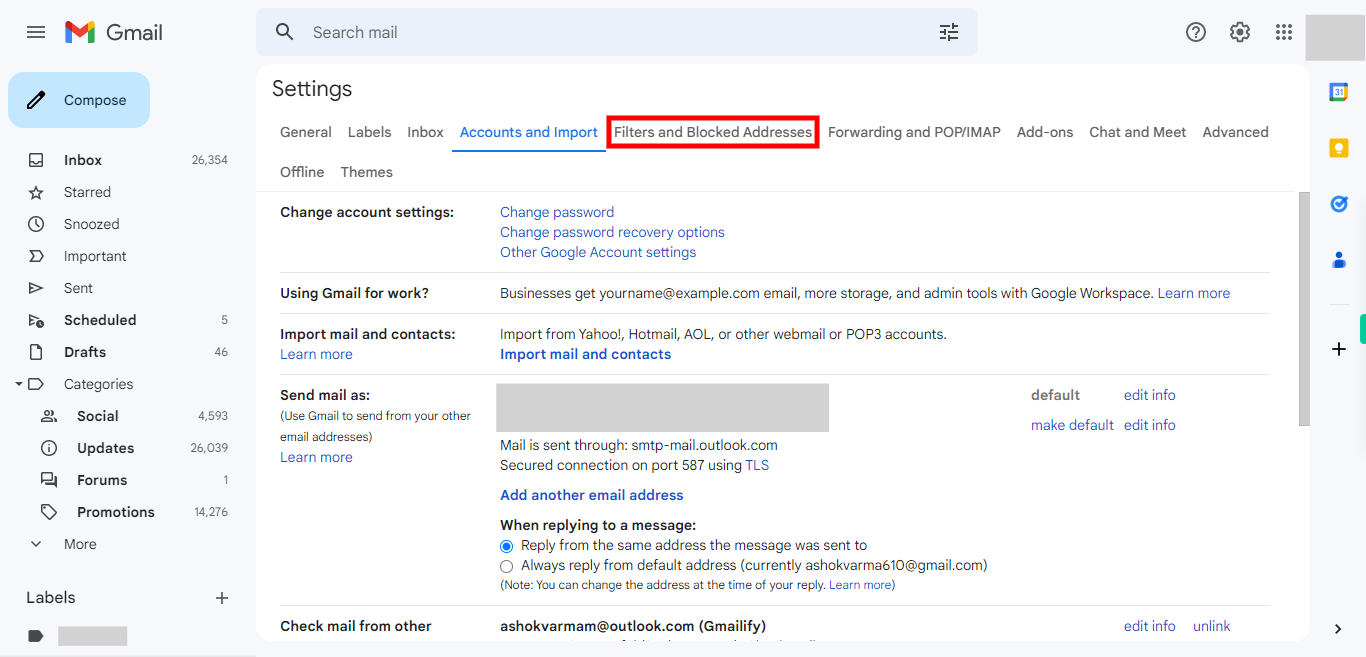
Click on the "Accounts and Import" tab and make modifications if required. Here are some common options you may find in the Accounts and Import tab - Check mail from other accounts, Add a mail account, Send mail as, Reply from the same address the message was sent to, Import mail and contacts, Send mail as, Link accounts, Grant access to your account, Import contacts, and Check mail now. Click on the "Save Changes" button located at the bottom of the page. Click on the Next button on the Supervity instruction widget. Note: Directly click on the Next button on the Supervity instruction widget if you don't wish to change anything.
-
8.
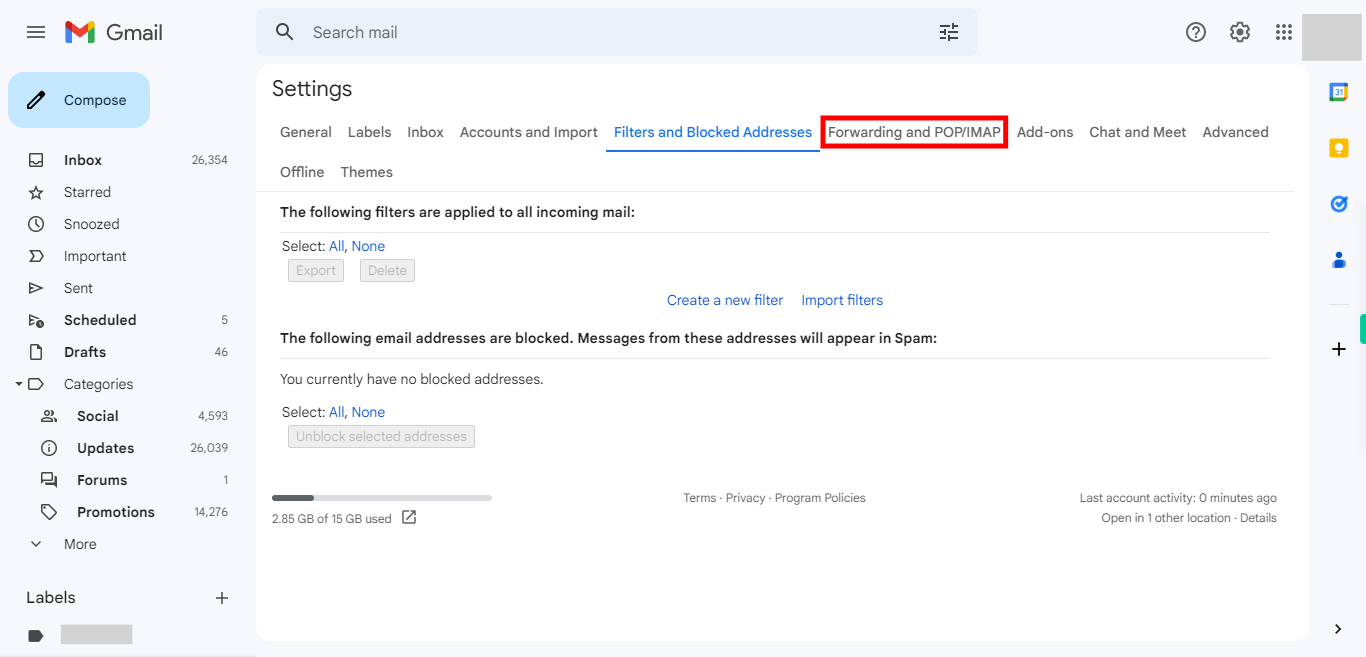
Click on the "Filters and Blocked Addresses" tab and make modifications if required. Here are some common options you may find in the Filters and Blocked Addresses tab: Create a new filter, Edit existing filters, Block addresses, Unblock addresses, Import filters, Export filters, Search filters, Filter forwarding, Filter actions, and Filter criteria. Click on the "Save Changes" button located at the bottom of the page. Click on the Next button on the Supervity instruction widget. Note: Directly click on the Next button in the Supervity instruction widget if you don't wish to change anything.
-
9.
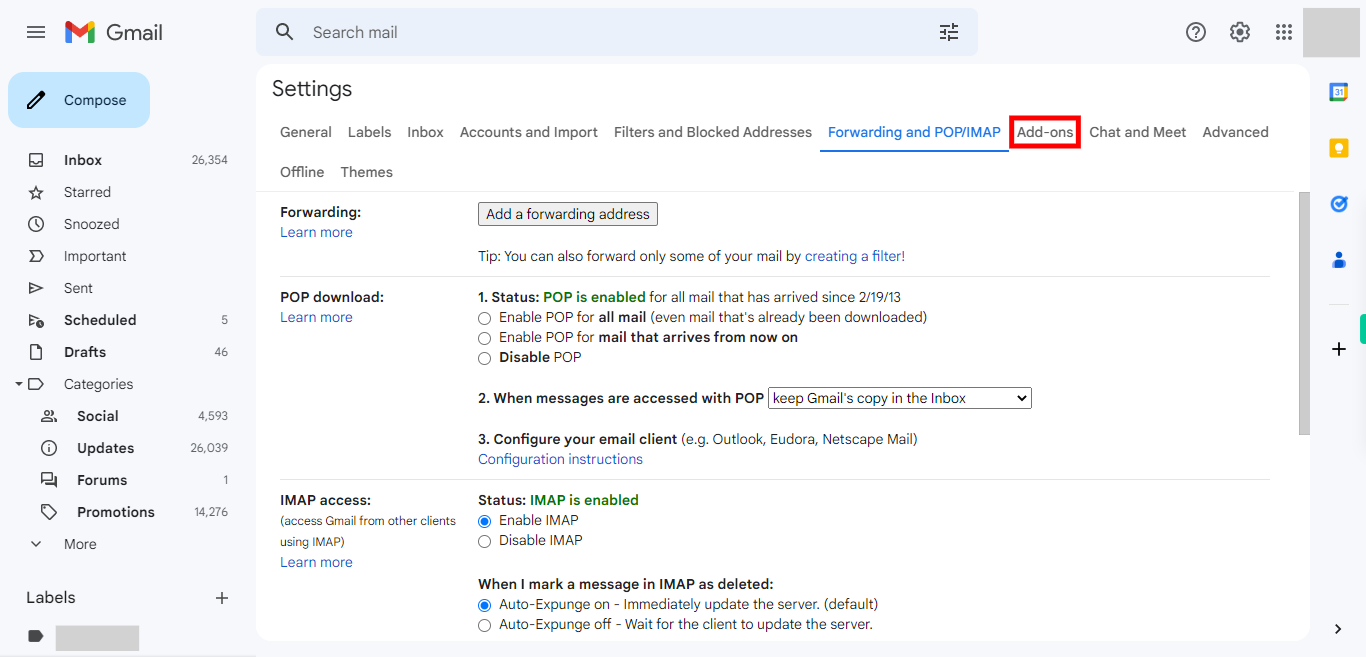
Click on the "Forwarding and POP/IMAP" tab and make modifications if required. Once done. click on the "Save Changes" button located at the bottom of the page. Click on the Next button on the Supervity instruction widget. Note: Directly click on the Next button on the Supervity instruction widget if you don't wish to change anything.
-
10.
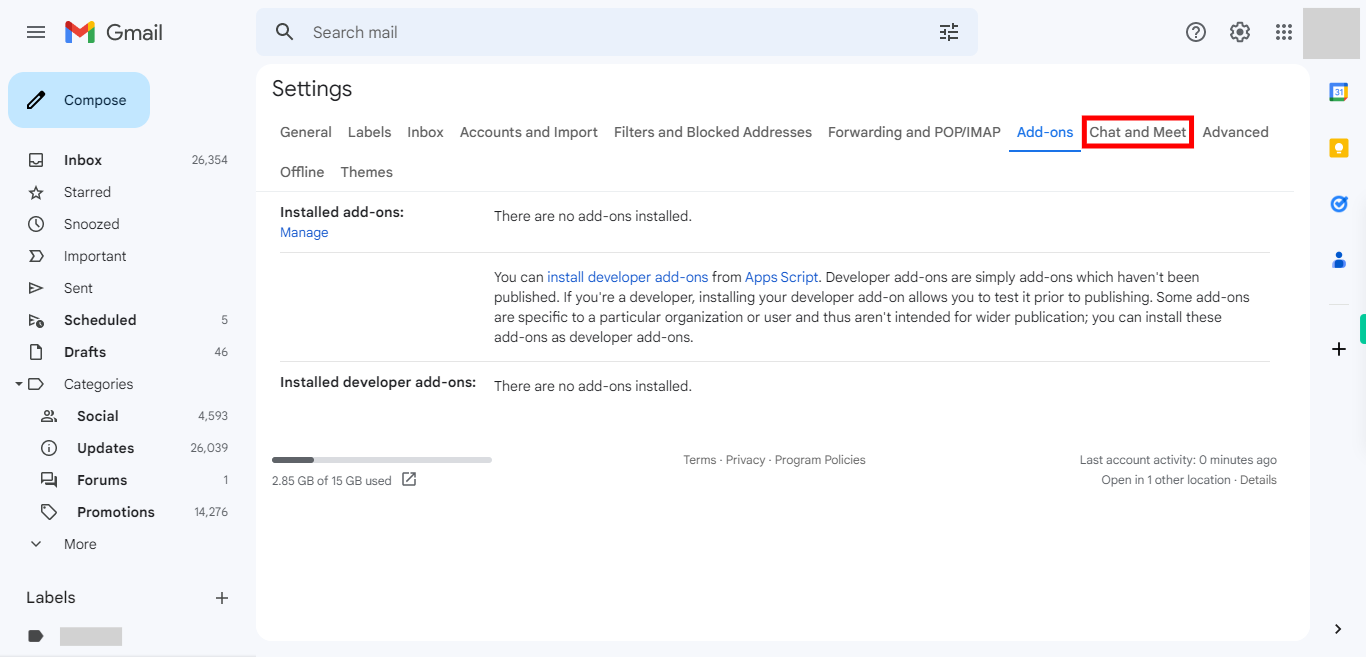
Click on the "Add-ons" tab and make modifications if required. Once done, click on the "Save Changes" button located at the bottom of the page. Click on the Next button on the Supervity instruction widget. Note: Directly click on the Next button on the Supervity instruction widget if you don't wish to change anything.
-
11.
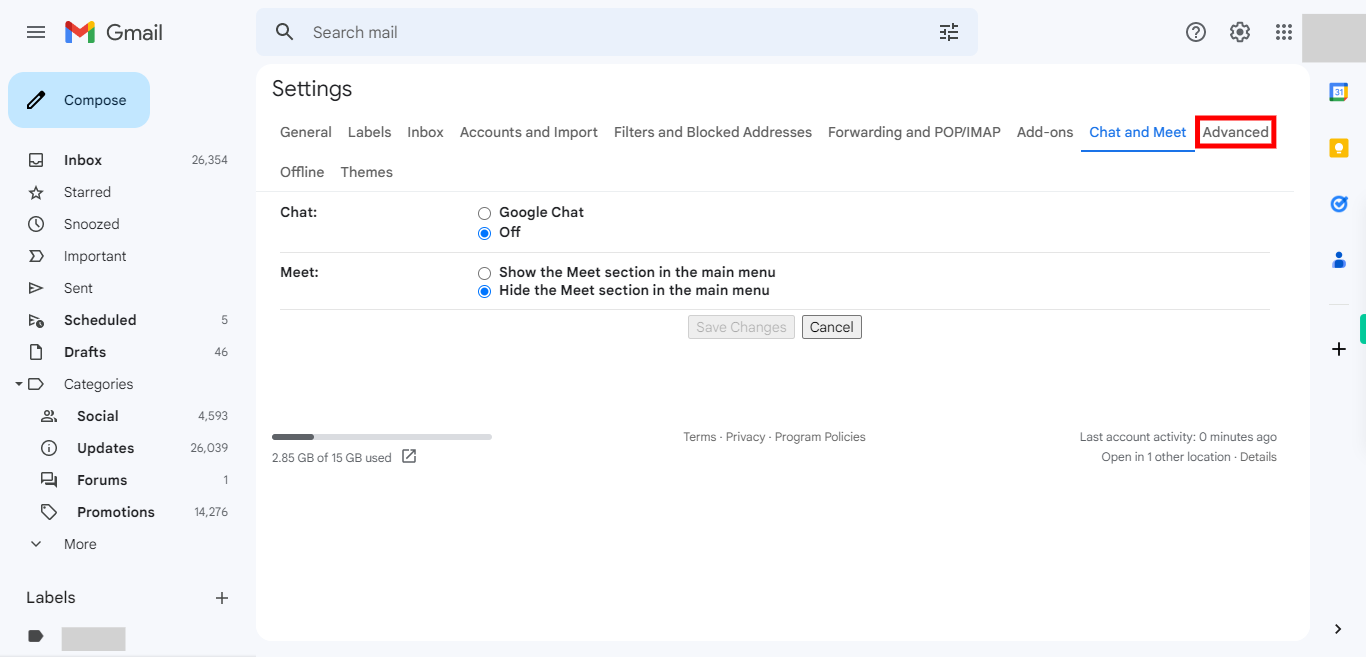
Click on the "Chat and Meet" tab and make modifications if required. Once done, click on the "Save Changes" button located at the bottom of the page. Click on the Next button on the Supervity instruction widget. Note: Directly click on the Next button on the Supervity instruction widget if you don't wish to change anything.
-
12.
Click on the "Advanced" tab and make modifications if required. Once done. click on the "Save Changes" option located at the bottom of the page. Click on the Next button on the Supervity instruction widget. Note: Directly click on the Next button on the Supervity instruction widget if you don't wish to change anything.
-
13.
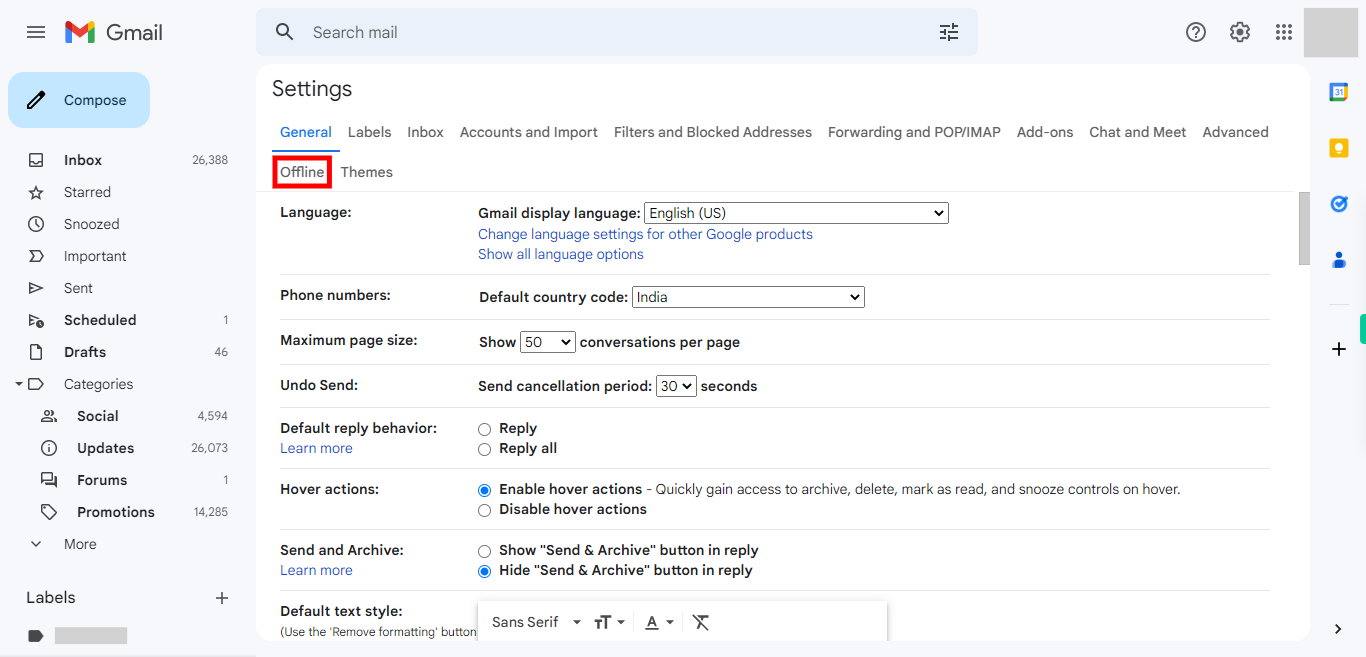
Click on the "Offline" tab and make modifications if required. Once done, click on the "Save Changes" button located at the bottom of the page. Click on the Next button on the Supervity instruction widget. Note: Directly click on the Close button on the Supervity instruction widget if you don't wish to change anything.


